Advertisement

Friday, June 7, 2019

How to Download and install Python on Windows?


About Python
  1. Python is a high level, interpreted, interactive an object-oriented programming language created by Guido van Rossum in 1989.
  2. Python is named after a British sketch comedy series ‘Monty Python’s Flying Circus’ and not after python-the snake.
For more information on Python, Click Here

Note: - Above link will get you to the 'Introduction to Python' PPT. 

How to install python in Windows 

First, check whether python is installed in windows or not.
  • Open Command Prompt Window by pressing Win + R keys on your keyboard. Then, type cmd or cmd.exe and press Enter.
  •  Now type the command ‘python’ and press Enter.
If python is installed in your system then the command will run python.exe and show you the version number.


Otherwise, below output will be shown on the console.


If python is not installed in your computer then follow the below steps:-
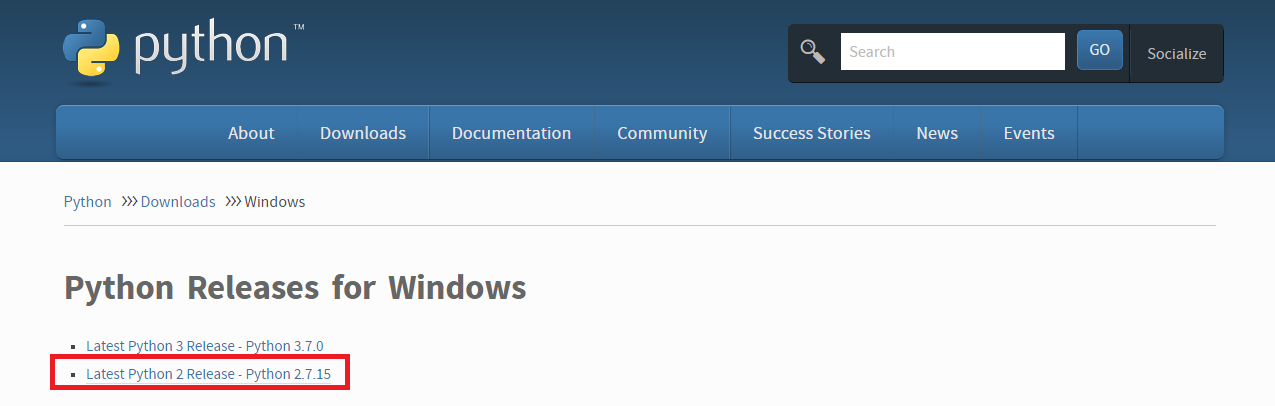
  1. Go to Python download page for windows.
  2. Select the version of python which you want to install on your system. Here, I would be installing the Latest Python 2 Release. Click on the "Latest Python 2 Release - Python 2.7.16" as shown in the below screenshot.
  3. Now, scroll the page down and click on "Windows x86 MSI installer" to download the Windows Installer File.
  4.       Double click on the downloaded file to start the installation wizard.    
  5.       Select "Install for all users" and click on "Next" button.
   
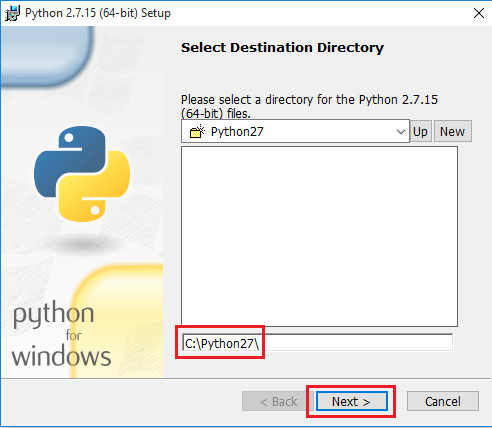
      6. Select the destination directory where you want to install the python. Kindly copy and paste in the sticky notes as we will need it to set the "PATH" later.


      7. Click on Next button until you are prompt to Finish Window.
      8. Click on the Finish button to complete the installation of python on your              system.

      Adding Python to Path in Windows 

          1. Navigate to the path given below path to set the 'PATH’
    My Computer > Properties > Advanced System Settings > Environment Variables
     
   2. Select the user variable named PATH and click Edit to change its value.
   3. Scroll to the end of the value and add a semicolon and add the location of the               python.exe file.
   4. Click OK to save the change.
 
Follow the steps <1> to <6> as shown in the below screenshot.


Note: If there is no user variable named PATH, then click on New… button. Add a variable named Path and make its value the location of python.exe.

Now open a new command prompt and type command ‘python’. On successfully installation of python on your system below output will be shown on the command prompt.


Thanks for following this tutorial, python is successfully installed on your system. If you have any query or facing any problem comment below.
If you have interesting in learning/getting knowledge about “Test Automation Using Selenium”. Click Here


Saturday, May 26, 2018

How to download and run Eclipse IDE?

What is Eclipse?

Eclipse is an integrated development environment for Java and other programming languages like JavaScript, C, C++, Python, Perl, etc. Eclipse is mostly written in Java and its primary use is for developing Java application but with the help of plugins, it can be used to develop applications in other languages. 
It supports almost 45 different languages including Hindi and operating systems like Windows, Linux, Solaris, and macOS. 
Development environments provided by Eclipse includes Eclipse Java development tools (JDT) for Java and Scala, Eclipse CDT for C/C++, and Eclipse PDT for PHP, among others.

Before going to download section first, check whether a computer is running a 32-bit or 64-bit of Windows. So, go to Control Panel >System and Security >System. 

Downloading and Launching Eclipse

You can download the eclipse from https://www.eclipse.org/downloads/. After clicking on the link, the page will list different flavours of the eclipse. Download it according to the requirement. Following are the steps for downloading the latest version of eclipse i.e(eclipse oxygen).

1) Below is the eclipse download page which will be displayed when above link is opened in a web browser. Click on Download Packages. 

2)  On the right side, there would be dropbox from where an operating system such as Windows, Linux, and Mac OS can be selected. Generally, Java developers use Eclipse IDE for Java Developers. Click on 32-bit or 64-bit as per the system. 
3) Click on the download button. Eclipse would start downloading as a zip file. After downloading it, extract the contents of zip file using WinRAR tool or use any other tool of your choice.
4) Eclipse named folder would have been created after extracting the zip file. Click on the folder. To launch the eclipse double click on the eclipse.exe file. 
5) As the Eclipse starts, you will need to select the workspace where all the data will be stored. You can customize the path or let it remain the default.
6) Click on Launch and you are all set to code in eclipse.

Don't forget to share and comment on the post. Happy Coding!!
Your feedback can help us to make this blog better. Thanks!!

Saturday, February 10, 2018

How To Increase RAM Using USB/Pendrive In Windows

Hi guys, In this post I would turn my normal USB flash drive into an extra virtual RAM.

For work or play games on PC/Laptop, there comes a point when we need to increase the RAM. The following problems can be faced by a person when he/she wants to increase the RAM. What if there is no extra slot on your mother board to put a new RAM or you don't have enough money to buy a new RAM. 

So, in order to overcome both the problems, we do have an alternative way to increase the RAM which is known as ReadyBoost. I know this trick is pretty old and it's awesome that if you know it. But some people are still not aware of this trick.   

What is ReadyBoost? 

ReadyBoost is a disk caching software component developed by Microsoft for Windows Vista and included in later versions of the Windows operating system. 
ReadyBoost is a feature in Windows 10, Windows 8, Windows 7, and Windows Vista where the operating system improves system performance by dedicating unused hardware space as virtual RAM - the SFCACHE file holds the data stored in this virtual RAM space.

Here, are the steps to set up ReadyBoost on your USB drive and speed up Windows 7, 8 & 10:

1) Insert Flash Drive. Delete all the data from the flash drive.

2) Now, Right Click on your pen drive and Open Properties.

3) Browse to ReadyBoost Tab. Next, click 'Use this device' and reduce your current memory space. Let's suppose, if the space is 3700 MB, then reduce it with approx ~100-200 MB for better performance.


4) Click 'Apply' and then 'OK' to apply the changes.

5) You are almost done!. Now, double click to open the USB Drive(I:). If configuration was successful, then "Ready Boost Cache File" would have been created. 

6) Restart your computer. 


Note:- If you don't want to use USB flash drive as RAM then, follow steps 2 & 3 and click on "Do not use this device ". Apply the settings and click "OK".

Saturday, January 6, 2018

10 Amazing windows shortcuts that everyone should know and use


Hi everyone, In this post I have listed the 10 Amazing windows shortcuts that you should learn and start using them right now. 

Windows shortcuts help you to work fast and efficiently, instead of performing laboriously and in more boring ways through the mouse & menus. 

So, go through the below list of windows shortcuts and try to use them as much as you can so, that it helps you to increase your efficiency.

1) CTRL + SHIFT + T  
Open any web browser such as Google Chrome, firefox, etc and use the given keys combination to reopen the previous closed tabs in that browser. Yes, just try it.This is my favorite shortcut and I know it would become yours too.

2) CTRL + TAB
Use this shortcut in a web browser to switch the tabs in a forward direction.

3) CTRL + SHIFT + TAB
This keys combination does opposite of above one. It will switch the tabs in backward direction.

4) CTRL + SHIFT + N 
Just create a new folder with this keys combination. 

5) WINDOWS KEY + D
Shows desktop. This helps you to move to main desktop immediately by minimizing all the opened windows.


6) WINDOWS KEY + TAB 
The combination is similar to ALT + TAB to switch between the windows in a more pleasing way. Some people think it is slightly slower so, they prefer using the other one key combination or mouse. But people still train them over both alternatives for more beautiful switching effect and also due to its additional functionalities i.e, helps you to create, view & close the virtual desktops.  

7) WINDOWS KEY + PRT SC  or ALT + PRT SC
Taking screenshot in windows was just annoying before this shortcut. To capture your entire screen and automatically save the screenshot, tap the Windows Key + PrtScn. Your screen will briefly go dim to indicate that you've just taken a screenshot, and the screenshot will be automatically saved in the Pictures > Screenshots folder.

*PRT SC - print screen key

8) WINDOWS KEY  + E
Opens File Explorer.

9) WINDOWS KEY + "+" or "-"
This is an awesome and easy shortcut to zoom in and out of a screen. It opens up the magnifier app directly to zoom in and zoom out of a screen.

10) a)WINDOWS KEY + CTRL + D
Creates a new virtual desktop for you.  
b)WINDOWS KEY + CTRL + LEFT/RIGHT 
Use this key combination to change from desktop to virtual desktop or vice-versa.
c)WINDOWS KEY + CTRL + F4
Closes the virtual desktop. Just move to the virtual desktop and use this combination to close it. 

Thanks guys for reading this post. Don't forget to drop your valuable comments below. Also, mention any topic on which you think i should write a post. 

Saturday, November 25, 2017

PPT - INTRODUCTION TO PYTHON BY NIKHIL KAPOOR

Hi everyone I'm back with another powerpoint presentation. Click here to view my previous ppt which was on 'Test Automation Using Selenium'. 

Some of you might be willing to learn a new programming language. Now,  many questions arises at this moment .Which language should you learn and why? Will it be useful if i learn that language? and so on. It's great to have all these questions. Believe me by the end of this powerpoint presentation all your questions will be answered. 

I hope you liked this article and kindly give your valuable comments below. 

Sunday, August 6, 2017

Protect your conversational and visual privacy with world's thinnest Nope Webcam Cover and Nope Sound Blocker.


The latest Nope computer privacy aids have been launched via Kickstarter in the form of a sound blocker and enhanced sliding web cam cover designed for smartphones, laptops and computers.

Anyone can hack into your computer and turn on the camera or microphone without you even knowing it. The only way to guarantee your privacy is to cover the camera  or block your microphone when you are not using it. The company believe that it is your space, so you should be the one to decide when your camera or microphone should be used.

Nope Sound Blocker


The micro electronic circuitry in Nope Sound Blocker forces your device to sense an installed mic. This turns off the device's on board microphones which blocks out sound.
  • simple to use 
  • Clean minimalist design 
  • works with laptops, desktops, smartphones

Nope Webcam Cover


Nope Webcam Cover is just 2 parts and 3M tape.  The mechanism is a slider that runs along the the top and bottom rails. It consists of combination of high grade aluminum for the outer rim and a polymer sheet for the slider.
  • World's thinnest (0.3 mm)
  • smooth sliding system
  • works on almost all devices

It's definitely a neat little setup if you're concerned about the possibility of someone listening in on your conversations or peering through your webcam. But, as with all Kickstarter projects, we'll have to wait until these start shipping to determine the quality of the hardware. There are different packs available, with webcam blockers starting at $10 for a pack of three, or sound blockers starting at $15 for one. Packs with sound block, webcam cover and ringchain holder start at $25. Click here to pre-order it.

Watch the crowdfunding video:


Saturday, June 24, 2017

PPT - Test Automation Using Selenium


To start with, first let's know what is test Automation?. Test Automation is a method in software testing that makes use of special software tools to control the execution of tests and then compares actual test results with predicted or expected results. 
To know more about test automation click here.

Manaul Testing of an application that is changed or updated frequently is time consuming, error prone and a very tedious job to do. So in order to overcome these probllems we use automation testing which is done with help of automation tools. The tools enable us to record the test suite and re-play it if required. 


So, what is selenium? Selenium is an open-source automated software testing tool for testing web applications. It‘s capable of working across different browsers such as internet explorer, Google Chrome, Mozilla Firefox, etc  and operating systems such as Windows, Linux, Macintosh, etc . Selenium is a set of tools that help testers to automate web-based applications more efficiently. These tools are Selenium RC, Selenium IDE, Selenium Webdriver and Selenium Grid.

Why Selenium?


  • Taking the other automation tools into consideration, Selenium has the capability to operate on almost every OS.
  • Selenium is an open source testing tool and hence it serves for cost-effective automation testing.
  • Selenium supports multiple languages such as Python, Pearl, Ruby, PHP, .NET (C#) and Java. You are required to be comfortable in just a single language in order to operate Selenium.
  • One highly beneficial feature of Selenium is that the language used for building the program is independent of the language that the web application or website is using. This implies that the test script can be developed in any of the languages that Selenium supports.
  • This testing tool supports a range of browsers like Opera, Safari, Chrome, IE 6, 7, 8 and Mozilla Firefox.
  • So far as Selenium is concerned, we have a number of robust methods for location of elements such as CSS, Xpath, DOM, and so on.
  • With Selenium, it is convenient to implement frameworks that revolve around Object oriented programming like Keyword Driven, Data driven and Hybrid.
  • Selenium provides support for integration of open source frameworks like TestNG, JUnit, NUnit and so on.
  • With the use of Selenium, it is possible to execute simultaneous tests leveraging various browsers on various machines. This is turn cuts down the time for test execution when a large project is in progress.
Following is the PowerPoint presentation on Test Automation Using Selenium.
I Hope You'll Like It.


Friday, June 23, 2017

What is Test Automation? | Benefits of Automated Testing


Test Automation is a method in software testing that makes use of special software tools to control the execution of tests and then compares actual test results with predicted or expected results. 

When we chooses to build and host a Web application; automated regression testing becomes a responsibility for accomplishment. As the need of Web applications are growing, with each subsequent release, testing needs to grow tremendously. Test automation with an efficient test strategy & right set of tools can relieve the manual testers of mundane labor intensive, repetitive time consuming tasks & allows them to concentrate their efforts on more value-added testing such as –  enhanced user experience testing and functional testing of both new and  changed features.

Benefits of Automation Testing

1.Performing Tests 24/7

No matter where you are in the world. You can start the tests when you leave the office and when you get back in the morning you can see the results and keep on working. You can even do that remotely if you don’t have a lot of devices or you don’t have the possibility to buy them.

2. Early Bug Detection

Automation helps you find bugs in the early stages of software development, reducing expenses and working hours to fix these problems as well.

3. Reusability

Well, this goes perfectly very easy to understand with automated testing. When you have your test scripts prepared using test automation tools, they are saved for the future requirements. So, you can utilize as many times as you want especially for automating regression testing.

4. Easy & Robust Reporting
Automation testing tools have this amazing benefit of tracking each and every test script. Each and every test script executed can be seen in visual logs. These reports can clearly show the no. of test scripts already executed, scheduled, their reported bugs and how they had been fixed.

5. Improves Accuracy

Here, no tester is being blamed. A tester with more than 10 years of experience can also make mistakes when they have to prepare the same old boring manual test scripts again and again. When this done with automated testing, not only the results are accurate, but also saves time.

6. Testing Capabilities


When it comes to capabilities, automated testing tools can test the web applications on the various browsers available in the market via browser testing automation.  Also, when it comes to mobile application testing, you can test them on various devices. This is next to impossible to achieve with manual testing.

7. Distributed Test Execution

Automated testing comes with distributed testing feature. You can easily execute your test scripts on more than one computer on a shared network or server simultaneously. So, you don’t need more than one tool, but only one automated testing tool will be all that you need.

8. Manpower Utilization

If you are implementing test automation in your testing processes, you will require less manual efforts. Thus, it will decrease the no. of people on just one particular project and you can utilize them in the various testing projects.

9. Testing Flexibility

The automated testing tools are developed by the teams who have been into manual testing for years. So, these tools are going to be flexible to match the future testing specifications. You can utilize these testing tools for longer periods of time — say for years.

10. Improves ROI

The most important benefit is the Return on Investment. Obviously, when you are planning to invest in automated testing tools, first you need to figure out how you are going to be benefited with those tools in terms of ROI.
The cost of manual testing includes the time, cost of manual hours and the efforts of the testers, QA managers, etc. And, if you have automated testing tools, you are going to test faster, easily, efficiently, accurately and would be delivering bug-free application within the delivery time period.


Tuesday, June 20, 2017

What to do when Facebook video with captions show on desktop but not on mobile?


There can be two scenarios when you talk about this question. First, when a person is viewing a video on mobile that completely depends upon captions. After watching the video that the person is not able to understand anything from it as the captions in his/her phone were not turned on. Second, you would have created an awesome video with captions for your Facebook page with lots of hard work and you might be thinking that it would get lots of likes and views from people. You uploaded on to your page, but after a day you came to know that it has not got that much of views and likes as it would have been. Later, by mistake you played that video on your mobile and came to know that captions were not shown in the video. But you know that at the time of uploading the video, you had attached the captions with it and captions were shown when you played it on the desktop. 

So, both scenarios can make a person frustrated and can be bad for your or other's Facebook page.

The problem is that when watching videos through mobile devices, the subtitles will not automatically turn on. Users will need to turn on subtitles through the mobile settings of the phone:


  •  On iOS: The person can turn on the captions when sound on by using the  System Setting > General > Accessibility
  •  On Android: The person can turn on the captions using the menu in the  fullscreen player. 
For Facebook owner/admin:-
People who watch your Page's video with sound turned off will automatically see captions (may not work on android phones). People who watch your video with sound turned on will need to turn on captions to see them(by using above steps). The language people see captions in is determined by their preferred language.


Don't let the video completely depend on captions because it may restrict your video to specific audience(people who have turned on captions/subtitles for the videos). The other thing which i used is, request people to turn on the captions. You can request them at the time when you post the video on Facebook page(as depicted in the above image). It really helped me to increase the views on my video. 

So guys, thanks for reading this post. Do comment the other things you might have done for the same reason. 


Friday, January 6, 2017

Xiaomi unveils a Tv that's 30% thinner than the iPhone at the CES 2017


Xiaomi has just announced its new television set, the Mi TV 4 at the CES. The TV measures just 4.9mm at its thinnest point and features a frameless design which allows for an essentially edgeless display. The Tv is also claimed to be 37 percent thinner than the Mi MIX and 30 percent thinner than the iPhone 7.

It's a 4K TV, which comes in 49, 55, and 65-inch variants, and Xiaomi is stressing that the television is modular, allowing users to swap out motherboard and other internals when they want to upgrade. In addition, the Mi TV 4 features Xiaomi’s “Patch Wall” software, which is said to be an AI system that can predict content based on what you’ve watched already.

The new Mi TV 4 will come bundled with Mi TV Bar which integrates 10 speakers, 2 wireless rear satellite speakers, and a subwoofer. The company also introduced Mi Port, which is a single cable that will connect the Mi TV Bar to the display and will carry all signals to and from the display for a clearer look.

The Mi TV 4 also ships with an independent home theater system that supports Dolby Atmos surround sound technology that lets you hear sound in 3D. That means you can hear a helicopter overhead or a person approaching from behind, just as you would in real life, instead of from the bottom of your TV where your speakers are.

The company has confirmed that the 65 inch Xiaomi Mi TV 4 will ship later this year in China for “well under” $2,000. Xiaomi will also sell the TV without the home theater system for, again, “well under” $1,500. Cheaper 55 inch and 49 inch models will be available as well. The company is yet to confirm if and when the Mi TV 4 will make it to the United States.


Wednesday, January 4, 2017

You can now control your hyundai car through google home


Hyundai’s Blue Link service, in addition to offering automatic emergency support, lets owners control various aspects of their cars remotely through a connected smartphone, Apple Watch, or Android Wear device. At CES 2017, the car company announced a new partnership with Google to add voice control for your car through the Google Home.

The integration works via Hyundai’s Blue Link software, which you tell Google Assistant to interact with in order to control connected features on the cars. This means that the car owners will be able to ask Google to start their car, lock doors, and perform other similar tasks. Blue Link also supports Google Maps, so you can send directions and addresses using Google’s mapping data straight to your car through voice control.


It also requires that a Hyundai car owner provide Google Assistant with their Blue Link PIN to ensure they actually have the authority to control the vehicle. This integration and support for voice control isn’t a new feature for Hyundai. The car maker has already offered similar capabilities of controlling your cars through phones and smartwatches. However, it will be one of the first official integrations for controlling a car with a digital home assistant.

Hyundai said that more features will be added soon but the company did not clarify what these additional features might be. It also didn’t specify an exact date as to when the Google Home integration will be officially released.

Tuesday, January 3, 2017

Hang & Roll - A perfect packing organizer for every traveler


Packing organizers have risen in popularity over the past years, with many traveling folk unable to imagine packing for a trip without them. They allow optimum use of the space in your luggage, keeping everything organized and in place during your travels, and making the task of unpacking and re-packing simple and stress-free. So, Hang & Roll can be the perfect packing organizer for every traveler. 


Hang and Roll is a brand for all persons with a strong desire to explore the world that wishes to have all their personal items clean and organized at all times. Whether you are a casual weekend-traveler, a passionate backpacker or an outdoors enthusiast, this product will help you to turn all your trips into unforgettable experiences. 

It is a travel organizer which combines the functionality of packing cubes and a shelf in the form factor of a tool roll. 


Hang & Roll Features :

  • Pack in seconds: Packing has never been easier. Just roll up your clothes, put them inside. Save a great deal of time and avoid wrinkles.
  • Well-organized: This bag has 8 individual pockets that let you easily access every single item. No more wasted time folding your clothes while traveling.
  • Waterproof: Wet clothes? No more! It is made of high-quality fabric, which will let your clothes to stay dry and safe all the time. Forget about stains and liquids.
  • Compact: Need more space inside your luggage? The bag design lets you organize and compress your clothes making some extra space.

  • Lightweight: It only weights 750 grams (26 ounces) and can easily hold 1 week of clothing! isn't that cool?

  • See-through: Every pocket has a transparent slit. So, you can easily see what’s in each pocket.
Hang & Roll company launched a crowdfunding campaign on Kickstarter and pledged MX$ 1,039,589. The company will start its shipping to all the project backers by the end of this month. To Order(ships only in a few countries) or for more updates about this product one can visit the company website.

(Note 1MX$ = Rs3.30 approx)

Featured