Saturday, May 26, 2018

How to download and run Eclipse IDE?

What is Eclipse?

Eclipse is an integrated development environment for Java and other programming languages like JavaScript, C, C++, Python, Perl, etc. Eclipse is mostly written in Java and its primary use is for developing Java application but with the help of plugins, it can be used to develop applications in other languages. 
It supports almost 45 different languages including Hindi and operating systems like Windows, Linux, Solaris, and macOS. 
Development environments provided by Eclipse includes Eclipse Java development tools (JDT) for Java and Scala, Eclipse CDT for C/C++, and Eclipse PDT for PHP, among others.

Before going to download section first, check whether a computer is running a 32-bit or 64-bit of Windows. So, go to Control Panel >System and Security >System. 

Downloading and Launching Eclipse

You can download the eclipse from https://www.eclipse.org/downloads/. After clicking on the link, the page will list different flavours of the eclipse. Download it according to the requirement. Following are the steps for downloading the latest version of eclipse i.e(eclipse oxygen).

1) Below is the eclipse download page which will be displayed when above link is opened in a web browser. Click on Download Packages. 

2)  On the right side, there would be dropbox from where an operating system such as Windows, Linux, and Mac OS can be selected. Generally, Java developers use Eclipse IDE for Java Developers. Click on 32-bit or 64-bit as per the system. 
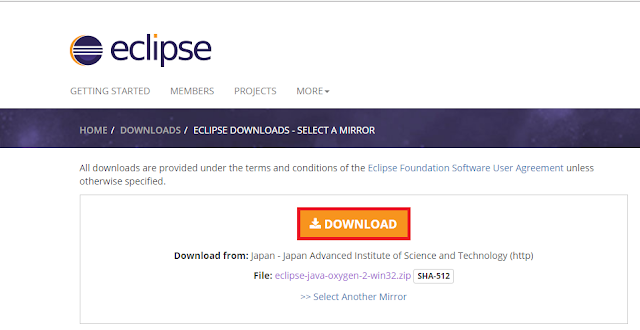
3) Click on the download button. Eclipse would start downloading as a zip file. After downloading it, extract the contents of zip file using WinRAR tool or use any other tool of your choice.
4) Eclipse named folder would have been created after extracting the zip file. Click on the folder. To launch the eclipse double click on the eclipse.exe file. 
5) As the Eclipse starts, you will need to select the workspace where all the data will be stored. You can customize the path or let it remain the default.
6) Click on Launch and you are all set to code in eclipse.

Don't forget to share and comment on the post. Happy Coding!!
Your feedback can help us to make this blog better. Thanks!!

Saturday, February 10, 2018

How To Increase RAM Using USB/Pendrive In Windows

Hi guys, In this post I would turn my normal USB flash drive into an extra virtual RAM.

For work or play games on PC/Laptop, there comes a point when we need to increase the RAM. The following problems can be faced by a person when he/she wants to increase the RAM. What if there is no extra slot on your mother board to put a new RAM or you don't have enough money to buy a new RAM. 

So, in order to overcome both the problems, we do have an alternative way to increase the RAM which is known as ReadyBoost. I know this trick is pretty old and it's awesome that if you know it. But some people are still not aware of this trick.   

What is ReadyBoost? 

ReadyBoost is a disk caching software component developed by Microsoft for Windows Vista and included in later versions of the Windows operating system. 
ReadyBoost is a feature in Windows 10, Windows 8, Windows 7, and Windows Vista where the operating system improves system performance by dedicating unused hardware space as virtual RAM - the SFCACHE file holds the data stored in this virtual RAM space.

Here, are the steps to set up ReadyBoost on your USB drive and speed up Windows 7, 8 & 10:

1) Insert Flash Drive. Delete all the data from the flash drive.

2) Now, Right Click on your pen drive and Open Properties.

3) Browse to ReadyBoost Tab. Next, click 'Use this device' and reduce your current memory space. Let's suppose, if the space is 3700 MB, then reduce it with approx ~100-200 MB for better performance.


4) Click 'Apply' and then 'OK' to apply the changes.

5) You are almost done!. Now, double click to open the USB Drive(I:). If configuration was successful, then "Ready Boost Cache File" would have been created. 

6) Restart your computer. 


Note:- If you don't want to use USB flash drive as RAM then, follow steps 2 & 3 and click on "Do not use this device ". Apply the settings and click "OK".

Saturday, January 6, 2018

10 Amazing windows shortcuts that everyone should know and use


Hi everyone, In this post I have listed the 10 Amazing windows shortcuts that you should learn and start using them right now. 

Windows shortcuts help you to work fast and efficiently, instead of performing laboriously and in more boring ways through the mouse & menus. 

So, go through the below list of windows shortcuts and try to use them as much as you can so, that it helps you to increase your efficiency.

1) CTRL + SHIFT + T  
Open any web browser such as Google Chrome, firefox, etc and use the given keys combination to reopen the previous closed tabs in that browser. Yes, just try it.This is my favorite shortcut and I know it would become yours too.

2) CTRL + TAB
Use this shortcut in a web browser to switch the tabs in a forward direction.

3) CTRL + SHIFT + TAB
This keys combination does opposite of above one. It will switch the tabs in backward direction.

4) CTRL + SHIFT + N 
Just create a new folder with this keys combination. 

5) WINDOWS KEY + D
Shows desktop. This helps you to move to main desktop immediately by minimizing all the opened windows.


6) WINDOWS KEY + TAB 
The combination is similar to ALT + TAB to switch between the windows in a more pleasing way. Some people think it is slightly slower so, they prefer using the other one key combination or mouse. But people still train them over both alternatives for more beautiful switching effect and also due to its additional functionalities i.e, helps you to create, view & close the virtual desktops.  

7) WINDOWS KEY + PRT SC  or ALT + PRT SC
Taking screenshot in windows was just annoying before this shortcut. To capture your entire screen and automatically save the screenshot, tap the Windows Key + PrtScn. Your screen will briefly go dim to indicate that you've just taken a screenshot, and the screenshot will be automatically saved in the Pictures > Screenshots folder.

*PRT SC - print screen key

8) WINDOWS KEY  + E
Opens File Explorer.

9) WINDOWS KEY + "+" or "-"
This is an awesome and easy shortcut to zoom in and out of a screen. It opens up the magnifier app directly to zoom in and zoom out of a screen.

10) a)WINDOWS KEY + CTRL + D
Creates a new virtual desktop for you.  
b)WINDOWS KEY + CTRL + LEFT/RIGHT 
Use this key combination to change from desktop to virtual desktop or vice-versa.
c)WINDOWS KEY + CTRL + F4
Closes the virtual desktop. Just move to the virtual desktop and use this combination to close it. 

Thanks guys for reading this post. Don't forget to drop your valuable comments below. Also, mention any topic on which you think i should write a post. 

Featured